Posts tonen met het label spring. Alle posts tonen

vrijdag 15 maart 2024

Tamponing an Easter bunny

 You need:

  1. colored paper
  2. tamponing brushes 
  3. white tempera paint
  4. pencil and color pencils  

A lesson to learn the technique of tamponing with a tamponing brush: do not move the brush back and forth, but stamp. Result will be a softer texture than when using normal brushes.  


No tamponing brushes in school? Give students a cotton ball in a cloth spin. 


Wat moet je doen?
Schets de contouren van een paashaas. Druk zo zacht mogelijk op je potlood, want dikke potloodlijnen blijven zichtbaar onder de witte verf. 
Tamponneer de haas en laat drogen. 
Teken met zwart potlood streepjes rondom.
Versier de tekening eventueel met lentebloemen. 

Alle kunstwerken zijn gemaakt door leerlingen van groep 4. 

Beeldaspecten: nuance, textuur. 


dinsdag 12 maart 2024

Pretty tulip prints


You need:
  1. corrugated cardboard or a cardboard box 
  2. scissors
  3. roller 
  4. blockprint or tempera paint* 
  5. colored or white sheets 
* blockprint dries more slowly and therefore works better than tempera paint. 


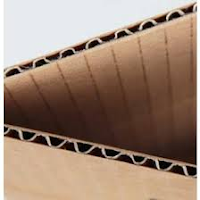
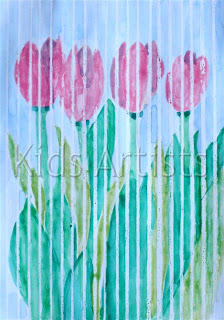
With cardboard boxes you can make beautiful prints. These tulips are cut from a cardboard box. 

roll in with block print

Cut a simple tulip from cardboard. Roll them in different colors and print several times on a sheet. Experiment with colors on top of each other and wet in wet. Print the tulips in several heights and let them overlap for a spatial effect. Let dry and stick the art work on a colored sheet. 


Elements of art: space, color, texture. 

zondag 21 mei 2023

A field full of daisies

Made by a student of grade 5

You need:
  1. white drawing sheet A3 size
  2. tempera paint in blue, green, white, yellow and red
  3. egg boxes or saucers
  4. brushes
  5. jars with water
  6. newspapers
  7. paper towels
  8. coloured paper for background
Daisies (bellis perennis) are, until it freezes, found in lawns. View pictures of daisies and discuss what they look like. 
Students start to paint the grass. They have to make their own green colors by mixing blue, white and yellow. Paint the entire sheet with small vertical strokes and let dry.

Then the daisies can be painted. In the front of the field daisies are larger  then further away. Use a small brush and a lot of paint, to make sure the green grass is really covered with the white paint of the flower. Use a different color green for the stalks or take the unmixed color green directly from the bottle. Paint the hearts of the flowers with big yellow blobs.
Paste the artwork on a matching background.

zaterdag 15 april 2023

Cherry blossom tree

You need:

  1. drawing sheet
  2. tempera paint in red and white 
  3. crayons
  4. liquid water color paint
  5. brush
  6. broccoli 

Step 1
Draw a tree with crayon.  


Step 2
Paint the background with diluted liquid water color paint and let dry.  


Stap 3
Stamp blossom with pieces of broccoli.  
 

Source: www.gluedtomycraftsblog.com 

donderdag 13 april 2023

Tulips; spring is coming!

You need:
  1. a bunch of tulips
  2. vases or glasses
  3. drawing paper A4 size
  4. white crayons
  5. water paint
  6. brushes
  7. jar with water
  8. colored paper for background
  9. glue

What does a tulip look like? What can you tell about the stem and the leaves? What do the petals look like? 
Every group gets a vase with some tulips. Students todraw a horizon line about a third from the bottom. 
Draw tulips with a white crayon. Look carefully at the tulips in the vase. The tulips must overlap.
Colour them with water paint, the white lines will remain. Paint the lawn and the air. Stick the artwork on a colored background.


dinsdag 11 april 2023

Japanese cherry blossom on a plate

You need:

  1. paper plates
  2. acrylic paint: brown, green, red, white
  3. brush
  4. crepe paper: pink, white, red
  5. glue 
This lesson about the Japanese cherry blossom is an old one, but now the blossoms are made on a paper plate. Too pretty to use for dinner! 
Branches are painted, leaves too. Not too big, because leaves only grow well when the blossoms are gone. 
Blossom is partly painted and partly made of crumpled crepe paper. 


vrijdag 31 maart 2023

April showers will bring us flowers

You need:
  1. white drawing sheet
  2. water colour paint
  3. ruler
  4. white crayon or oil pastel
  5. paint brush
  6. water
Characteristicly Dutch weather in spring is a weather type with showers, alternated with sunny periods. We call those typical spring showers 'Maartse buien' (March Showers), while English meteorologists speak about 'April showers who bring us flowers'. 

In this lesson children draw spring flowers (tulips, daffodils etc.) during a rain shower.
 
Sketch some spring flowers on a white sheet. Make sure your lines are extremely thin. Use your ruler to draw white crayon lines with one centimeter between them. Make sure your crayon has a sharp point. Paint your drawing with watercolour paint. Use a lot of water to make bright colours. The crayon will resist the water paint, so your shower will be very clear!

woensdag 29 maart 2023

Animals in spring like Hans Innemee


by students of grade 1-2
You need:

  1. grey construction paper 21 bij 21 cm 
  2. oilpastels
This lesson is for grade 1-2. In 2012 I wrote a lesson for grade 3-4 about Hans Innemee. 

Hans Innemee (1951) is a Dutch artist. View artwork of him with the students. Discover the small stories in his work. Can you tell a small story while looking at these two birds? 


Discuss the artworks: 
  1. subject: animals
  2. few colors
  3. frame
  4. simple background
Task for today: draw young animals in spring. Color them with oilpastels. Outline with black around the drawing. 

donderdag 8 juli 2021

Fun flowers


You need:
  1. white or colored drawing sheet
  2. scraps of colored paper 
  3. scissors
  4. glue
  5. black markers

Cut several circles from scraps of colored paper and paste them om the drawing sheet. Paste smaller circles on the bigger ones. Draw petals using several black markers in several thicknesses.   

Source: Krokotak.com

maandag 15 maart 2021

Snowdrops

 You need:

  1. white construction paper 10 by 10 cm and 15 by 15 cm
  2. oilpastel
  3. soft crayons
  4. white drawing sheet
Draw a frame around the drawing sheet at 1 cm from the edge. Color the background with oil pastel, pastels or a combination of these. Only use the colors yellow, green and blue.
Draw two flower stems with green oil pastel. 
Fold two snowdrops from the white sheets. Stick them on the work. 


Elements of art: color, nuance. 

vrijdag 29 april 2016

Birdies on a branch

Made by a student of grade 1

You need:
  1. liquid water color paint
  2. brushes
  3. crayons
  4. white sheet
  5. feathers
  6. glue
Draw a branch with some birdies on it. Their eyes should be big and white! Color the birds with crayons using bright colors. Paint the branch and background with water color paint. Let dry. Draw feet and paste feathers. 

donderdag 5 juni 2014

Flowers in front of the windows

You need:
  1. coloured construction paper  
  2. tin foil (cut in pieces before lesson starts)
  3. strips of white paper, 2 cm 
  4. black  construction paper 
  5. white drawing sheets 
  6. tempera paint
  7. brushes
  8. scissors
  9. glue 

This lesson is about the flower pots you'll see in spring and summer.
The students get a large piece of oloured construction paper  for the background. Paste the window in the middle of it, with the white strips on it as a inner frame. Cut a pot from black paper. Draw and paint flowers on the white sheet. Cut them after drying with an edge of 1 cm. Paste them in front of the window. Paste the pot on the flowers. Decorate the pot with paint.

Source: Pinterest.

donderdag 15 mei 2014

Funny birds like James Rizzi


I came across this great lesson for our first graders on Deep Space Sparkle. What a fun our students had, making these cute little birds in the style of James Rizzi!

James Rizzi was born in 1950 in Brooklyn. He studied art in Florida (Gainesville), where he started experimenting with printing, painting and sculpting. Rizzi’s work often shows his birthplace New York. His paintings look sometimes childishly naive, with the bright colours and brilliant gaiety. In the art press Rizzi is often described as "Urban Primitive Artist '. Rizzi himself says he is influenced byzelf Picasso, Klee and Dubuffet.

Show some paintings of Rizzi and discuss the characteristics:
  • bright colours
  • no gradations within colours
  • evertything is outlined with a black marker
  • the artwork is full and busy
  • background is full and busy too
You need:
  1. white drawing sheets A4 size cut lengthwise
  2. markers
  3. scissors and glue
  4. blue cardboard A1 size for background
Discuss birds in Rizzi's artwork (google onRizzi + birds) and ask students if the typical Rizzi features are in the bird artworks too. 

The goal for this lesson: 
Use oilpastel to draw a bird just like Rizzi did. Use watercolour paint and paint the bird in one or two colours. Paint the background with several colours.

Artworks made by students of grade 1

donderdag 10 april 2014

Sheep in the meadow

Made by a student of grade 2

You need:
  1. drawing sheet 
  2. tempera paint
  3. stippling brushes
  4. masking tape
  5. black and white construction paper
  6. glue
Make a fence on the sheet with masking tape. Draw a horizontal line above the fence. Stamp with different colours the meadow. Do not mix the paint. Stamp some spring flowers too.

Stamp the air in the same way with white and blue.
Remove the masking tape. Do this when the paint is still wet.
Cut some clouds for the body of the sheep out of a white sheet. Cut heads and feet out of black paper. Paste the sheep before the fence. Draw eyes and beak with white pencil.

Source: Artsonia. 

vrijdag 14 maart 2014

Stacked birds

 
Made by students of grade 3/4

You need:
  1. drawing sheet 20 by 40 cm
  2. crayons
  3. liquid watercolour paint
  4. brushes
Inspirated by a picture on Pinterest.
Draw at least three birds sitting on eachothers back. The birds have to get smaller while getting higher. Colour with crayons.
Paint the background with liquid watercolour paint leaving an edge from about 1 cm. 

zaterdag 27 april 2013

Rollercoaster fun


You need:
  1. oil pastels
  2. drawing sheet
  3. watercolour paint
  4. brush
  5. jar with water
After a school trip to an amusement park, these drawings were made. The goal was to draw what you liked most in the park and make sure you're part of the drawing.
Coloured with oil pastel and then painted with a brush and watercolour paint.


Made by styudents of grade 4

dinsdag 29 januari 2013

Suburb for birds

Made by students of grade 4

You need:
  1. coloured cardboard 
  2. wallpaper 
  3. wrapping paper
  4. tempera paint
  5. black marker
  6. brushes
  7. scissors and glue
Students draw a birdhouse with a special entrance on brown wrapping paper. This entrance can be a heart, a star of even a bird. Cut this entrance and outline the hole with a black marker.
Paint the house with cheerful colours.
Paste it on a piece of wallpaper and cut it out with 2 cm around. Paste a strip of black paper on the cardboard, this is the standard for birdhouse. Paste the birdhouse on the standard. Outline the house with black marker.

All birdhouses together will make a colourfull suburb for birds!

Thanks to Maureen Kaal 

dinsdag 23 oktober 2012

Four season trees

 
You need:
  1. four white drawing sheets A6 size (postcard)
  2. Q-tips
  3. tempera paint
  4. coloured corrugated cardboard
  5. silver and gold markers
  6. fiberfill
  7. glue
How can a deciduous tree tell you what season it is? What colours do they have in spring, summer and fall? What does a tree look like in winter?

Discuss these questions at the beginning of this lesson. Write on the board the colors in the spring heard (light green, green, white, pink - blossom), which belong to the summer (green, dark green, yellow) and the autumn colours (brown, orange, red, yellow). And in winter there aren't any leaves. left of course.

 
The students will make a tree for every season. The colours of the leaves have to show what season it is. The log is "painted" with a Q-tip, the leaves have to be may only be spotted. Remember that in fall there are a lot of leaves on the ground! Use fiberfill (snow) for the tree in winter.
 
Paste the trees next to each other on a piece of corrugated cardboard. Design it with gold or silver marker and write the seasons above the trees.  

Organisation:
Give each groep of six students an eggtray with several colours of paint. Give each student a Q-tip to paint the trunk. Per groep een eierdoos met de verschillende kleuren verf. Geef de leerlingen elk een wattenstaafje voor de boomstam.For the dots: one Q-tip per colour for common use.
 
Artworks made by students of grade 3
 
Thanks to Maureen Kaal

woensdag 9 mei 2012

Half chicken


You need:
  1. drawing sheet A4 size
  2. oil pastels
  3. blue liquid water colour
  4. brush
  5. jar with water
In this lesson students draw one chicken together. Fold a sheet in half and draw a half chicken. Colour with oil pastels. Draw with white oil pastel one or more eggs. Give the sheet folded to a fellow student, and be sure he does not see what was drawn. Tell what there has to be drawn, the head or the body. Mark with two little lines the places where the fellow student has to connect and draw a mark for the hight of the horizon line.
If the second student is ready, they fold up the sheet open. Hilarious!

Paint the whole drawing with blue water colour paint and lots of water. The oil pastels will resist the water and thus the white eggs come forward again.
 
Artworks made by students of grade 3

donderdag 22 maart 2012

Henhouse

Made by students from kindergarten
You need:
  1. box
  2. brown tempera paint
  3. brush
  4. paper plate
  5. white paper 
  6. red paper
  7. black marker
  8. straw
Paint the outside of the box with brown tempera paint. Fold the plate. Outline your hand and cut it twice out of a white sheet. Paste the hands on both sides of the chicken. Cut a comb and a beak out of red paper and paste them. Paste some feathers for the tail. 
Put the box on its side. Put some straw in the box and put the chicken in it. Stack the boxes of several students for a big hen house!